Every year I cut a LOT of silver wire into tens of thousands of jump rings. As the saw bites through the precious metal, it throws off lemel, the metal equivalent of sawdust. Unlike sawdust, silver lemel remains precious, and can be sold for scrap, so it’s well worth catching and saving. To that end, I created a Lemel Trap to use with my Jump Ringer (TM).
Turns out the Trap is useful for containing the dust and mess from other flex shaft applications as well, plus it’s laughably simple to make, cheap, and dead easy to use.
Must have one for yourself? Read on! I took lots of pictures :).
(Click on any of the pictures to see them bigger. There are lots of them, so I kept them small in the post, but you can see more detail in the larger versions.)
First, you’ll gather up a few items…
Tools:
- Dividers
- Ruler
- Scissors
- X-Acto knife
- Drill bit (I used 1/8″)
- Glue gun
- Sandpaper scrap (coarse)
- Permanent marker
Materials:
- Clear vinyl sheet (4mil-8mil thick, about 1 foot sq.)
- Clear flexible plastic container, at least 9″ long (128 oz or larger)
The clear vinyl is the kind you get in big sheets at the hardware store for insulating windows. My fabulous local Ace Hardware sells it by the foot. For a single Lemel Trap, you only need a piece about 6″ wide and 12″ long.
For the plastic container, I like the ones made of PET, which is the flexible type of plastic used in soft drink bottles. It’s easy to work with, and won’t crack like Lucite or other hard plastic, but it’s like the hard plastics in being completely crystal clear. The clarity really is important. Don’t settle for a slightly opaque container. You need to be able to SEE what you are doing inside it.
Ideally, you want a container with mostly smooth, flat sides. The ones I have used are the kind that are sold as storage containers for cereal, snacks, cat kibble, etc.
Once you’ve rounded up your tools and materials, here’s what to do with them…
1) Make Your Hole: I chose to make my hand opening 3.5″ in diameter. You can make the opening larger, just be sure you have enough room around the hole to glue on the vinyl.
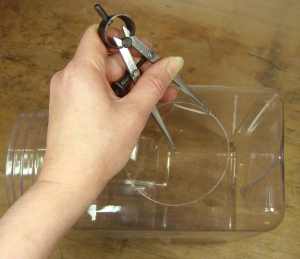
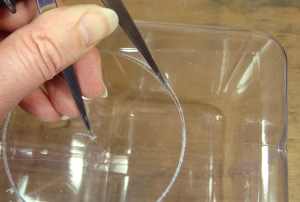
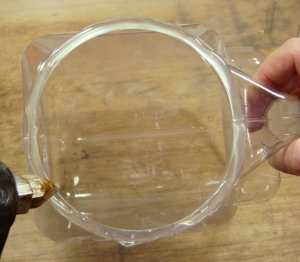
For a 3.75″ hole, open the dividers to 1.75″. Choose which side of your container you want to put your hand through, and place the point of one divider leg in the center of that side. Scribe a circle with the dividers, pressing fairly hard.
After going around several times, the sharp point of the dividers may start to cut through the plastic.
Use an X-Acto knife to gently finish cutting away the hole.
Then sand the edge smooth with a scrap of coarse sandpaper.
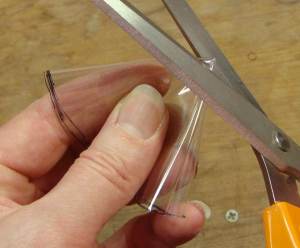
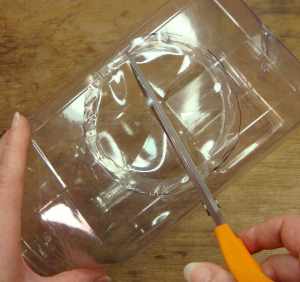
2) Cut Vinyl Circles: Use the cut-out circle of plastic, and the plastic lid from the container as templates, and cut 2 circles of vinyl sheet that are roughly 1/2″ bigger all around than the templates.
Fold each circle in quarters and snip off the tip of the resulting wedge shape.
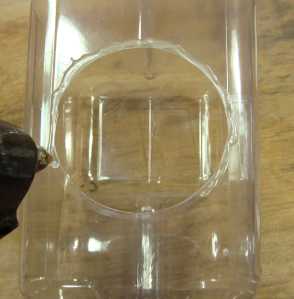
3) Glue Circles Over Openings: Run a thickish bead of hot glue around one opening, and quickly press the vinyl circle into place. Squish it down so that there are no gaps or crevasses where lemel could get trapped.
Repeat for the other opening. Once the glue is set, you can trim away the excess vinyl from around the outside edges.
When the glue has cooled and become solid again, insert the point of your scissors into the holes in the centers of the vinyl circles, and make 6 evenly spaced cuts from the center to the edges of the openings, as if you were dividing a pie into 6 pieces.
4) Create a Lemel Removal Port: Mark one of your top corners with a permanent marker. Make the mark big enough to notice from across the room. You want to be sure that when you are using the Trap, this corner is always up. If the corner with the hole ends up facing down while you are cutting, drifts of precious lemel will fall out of it.
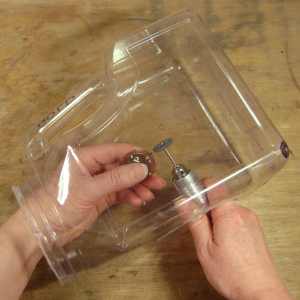
Hold the 1/8″ drill bit in your hand and gently drill a hole in the plastic right at the corner.
Sand the inside of the hole with your scrap of coarse sandpaper, and smooth the edges with a round needle file. You don’t want any bits sticking out that will stop the lemel from pouring easily through the port.
5) Prepare a Lemel Storage Container: Put a label on a plastic film canister, or other small airtight container, and weigh the container with its lid and label. Write this tare weight in troy ounces or grams on the label. When the container is eventually full of silver lemel and you want to know how much the metal weighs, you can weigh the whole thing and subtract the initial tare weight.
To use the port and get the lemel into the storage container, tap all the lemel into one bottom corner of the Trap, then gently turn the Trap over and pour it through the port into your storage container. I also like to use a soft brush (like a drafting brush) to sweep the inside of the Trap before decanting the lemel.
The pictures below show the beginning and ending positions of my Jump Ringer (TM) when used inside the Lemel Trap. You can also use the Trap with the Koil Kutter (from PotterUSA), or the Pepe Jump Ring Maker (not my preferred version of this tool, but that discussion must wait for a future post…).
Regardless of whether you are right-handed or left-handed, you’ll be holding the flex shaft with the attached cutting arbor (and guide/cover) in your right hand. You’ll be pulling it towards you to cut, so you’ll start by setting it on the end of the coil holder furthest away from you.
There’s not enough room inside my Lemel Trap to just hold the coil holder stationary and only move the flex shaft attachment. So, when you are cutting, you’ll be pulling the cutting wheel through the metal towards you with your right hand, AND pushing the coil holder steadily away from you with your left hand.
Your starting position will look like this:
Your ending position will look like this:
You can also use this contraption for many other flex shaft tasks, like sanding and polishing. Be sure to dump the resulting dust into your sweeps bucket, NOT into your lemel container.
There’s not much room in this smaller Lemel Trap for these alternative jobs, so I have a slightly larger version that I use when I want to have both hands inside the container:
This hexagonal shape is also comfortable because your hands can be at a more relaxed angle, that is, they are not constrained to 90 degrees.
Whew! Okay, I think that about does it!
xo,
P.S. Did a friend forward this post to you? Did you stumble on it by accident? Want to eliminate the element of chance? Click here to get on my direct list.











I have the Pepe Jump Ring Maker. The instructions say to use bur life on the coil of jump rings. Is the bur life a problem in your lemel container? Can the rings be cut without it?
You should absolutely use lubricant on your metal jump ring coil. I certainly do, and I apply it all along the whole length of the coil where the saw will pass. I use the solid bur life lubricant that comes in a push up stick, and have had no problem with it in the Lemel Trap. The liquid bur life might be a different story, but I haven’t tried it, so I have no data to share :).
Thanks Julia. I wondered, since it contributes to the weight of the lemel.
Wonderful idea! Thanks so much!!!
Thanks so much, Julie. I like the way you think. This is so timely as I am about to go to Orcas Island to teach a quickie workshop making chain mail earrings. From making the rings to the ear wires. I will share your idea and give you the credit. Perhaps they will also join your group.
Thanks, Rene. I’m glad to hear you’ll get good use out of this tool so soon. Have fun on Orcas! It’s so beautiful there. By all means do encourage your students to subscribe to my newsletter. The more the merrier :)!
Line the inside edge of the cutout with a piece of rubber or silicone tubing and it won’t rub on your hand or wrist. General good idea to relieve/pad edges of all spots that press on you or on soft metal.
Thank you so much for this clever tool! My workspace is used for creating art, my computer space and jewelry making. Dust from sanding, etc. has always been a problem…this will work perfectly to keep it contained.
Excellent! Glad I could help :).
This is a great idea. Not just to save lemel but also to stop iron/steel particles from getting on my clothes while I am using a dremel tools to grind or cut items. When I get iron filings on my clothes it makes rust stains in the wash, which makes family members mad.
Thanks,
David
I hadn’t thought of that, David, but it sounds like an excellent idea, and anything that improves the humor of your family members is surely a good thing :)!
Julia, this is brilliant. Q on your larger container – what sort of container did you re-purpose? Did you buy this container as “store your cereal” etc, or did it come as a container full of something to eat? My workshop area really needs this because space is shared w/ laundry.
I also appreciate JewelryGuy’s tip to line the cut edges of the lemel trap w/ silicone tubing. I have tubing in various diameters from one of the big box hardware stores and will include his suggestion as I make my trap.
Best, Mary
Hi Mary, I bought the larger plastic hexagon storage container new from Tap Plastics here in Seattle. Here’s the link to this item on their web site: http://www.tapplastics.com/product/plastics/plastic_containers/plastic_hexagon_container/575. The one I bought was the larger one, 10.5″ high, 342 oz.
Where are the gloves? When cutting or drilling it has risk.
Gloves can be very dangerous to wear when using rotary power tools, as they can get caught in the spinning parts and can break and mangle your fingers :(. If you want to keep your fingers clean while using rotary power tools, the best option is to use finger cots that only cover the ends of your fingers (no further up than the first knuckle). If these get caught in the tool, they will pull off your fingers and are much much safer than gloves. Gloves and rotary power tools should NEVER be mixed. https://en.wikipedia.org/wiki/Finger_cot
Genius! I just begun wood carving and bought all the tools. Then I researched how unsafe saw dust is. So I felt stupid and pushed my new hobby to the back burner but after seeing this pin. It’s no longer back burner. I’m so happy I can resume my wood carving hobby again.
That’s awesome that you found my post helpful for your woodworking!